_StriveG Blog

fresco内存管理

1. Fresco中的内存管理模块

fresco中的内存分为两个部分,

  • 解码的
    • 在5.0之上存在java堆中
    • 在5.0之下位于Ashmem中
  • 未解码的
    • 位于native 堆中,这部分是在c++中申请的,不受限于app可以使用的最大内存。但是需要自己管理。

而这两部分都设计到native。 对应java层的代码在imagepipeine/memory 和nativecode中。

2. 匿名共享内存部分

这部分内存类似于Native内存区,但是它是受Android系统底层管理的,当Android系统内存不足时,会回收Ashmem区域中状态是 unpin 的对象内存块,如果不希望对象被回收,可以通过 pin 来保护一个对象。在bitmap存在Ashmem,也很简单,只要我们将BitmapFactory.Options的inPurgeable属性设置为true即可,考虑到我们这里的图片可能会复用,我们会开启inMutable属性,关于这个属性,建议大家如看文档,看看inMutable和inBitmap。

光这样是不够的,我们需要在需要的时候pin住,不需要的时候unpine,这些我们利用 bitmap.h 中的两个相关的函数。

1
2
AndroidBitmap_lockPixels
AndroidBitmap_unlockPixels

pin和release实现的部分在Bitmaps.c部分。

3. 从NetworkFetchProducer开始谈 native heap的管理

NetworkFetchProducer负责从网络上下载图片,下载成功之后回调onResponse方法。改方法如下:

1
2
3
4
5
6
7
8
9
10
11
12
13
14
15
16
17
18
19
20
21
22
23
24
25
26
27
28
29
private void onResponse(
FetchState fetchState,
InputStream responseData,
int responseContentLength)
throws IOException {
final PooledByteBufferOutputStream pooledOutputStream;
if (responseContentLength > 0) {
pooledOutputStream = mPooledByteBufferFactory.newOutputStream(responseContentLength);
} else {
pooledOutputStream = mPooledByteBufferFactory.newOutputStream();
}
final byte[] ioArray = mByteArrayPool.get(READ_SIZE);
try {
int length;
while ((length = responseData.read(ioArray)) >= 0) {
if (length > 0) {
pooledOutputStream.write(ioArray, 0, length);
maybeHandleIntermediateResult(pooledOutputStream, fetchState);
float progress = calculateProgress(pooledOutputStream.size(), responseContentLength);
fetchState.getConsumer().onProgressUpdate(progress);
}
}
mNetworkFetcher.onFetchCompletion(fetchState, pooledOutputStream.size());
handleFinalResult(pooledOutputStream, fetchState);
} finally {
mByteArrayPool.release(ioArray);
pooledOutputStream.close();
}
}
  • 通过mPooledByteBufferFactory申请同样大小的一块内存区域的输出流
  • 将内容输入
  • 通知上层处理

我们分段来看

3.1 构造输出流

PooledByteBufferFactory对应的实现是NativePooledByteBufferFactory,在他的newOutputStream方法中,构造一个NativePooledByteBufferOutputStream,注意,要传入两个参数,一个是NativeMemoryChunkPool,对应natice 内存池,另外一个就是要申请的容量大小。

这样就构造出一个输出流。

3.2 输出数据

上面的步骤构造出NativePooledByteBufferOutputStream,接下来就是通过他的write方法输出。

1
2
3
4
ensureValid();
realloc(mCount + count);
mBufRef.get().write(mCount, buffer, offset, count);
mCount += count;
  • 校验有效性
  • 重新申请内存
  • 将原来来写入到内存中的数据加上现在数据,复制到新的native内存中
1
2
3
4
NativeMemoryChunk newbuf = mPool.get(newLength);
mBufRef.get().copy(0, newbuf, 0, mCount);
mBufRef.close();
mBufRef = CloseableReference.of(newbuf, mPool);

mPool在这里对应的实现是NativeMemoryChunkPool。get方法在basebool中,会做一些工作,这里不细说,最后会调用alloc方法申请内存,alloc方法中,构造NativeMemoryChunk对象,这个构造方法中会调用,nativeAllocate方法,在jni中申请内存,这个后面和其他的native处理一块说。

然后会调用NativeMemoryChunk#copy 做一些内存操作。根据两块不同的内存大小,来做操作,这里的代码 非常好,会使的工作量降到最低。最后在doCopy中通过nativeMemcpy这个native函数实现。

最后调用close方法,释放内存,这个最后会调用到NativeMemoryChunk#close方法,调用nativeFree,释放内存。

4. 对应的native操作。

上面提到的两个native操作,都在NativeMemoryChunk.c中。先看对应的方法表。
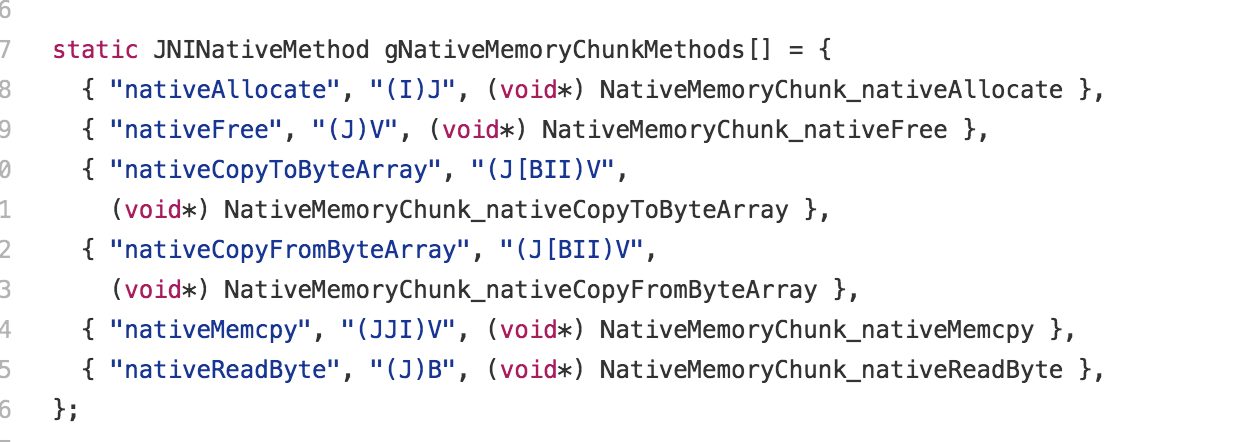
下面就来对其中一些进行说明。

4.1 NativeMemoryChunk_nativeAllocate

这个是用来申请内存的。

1
2
3
4
5
6
7
8
9
10
11
12
static jlong NativeMemoryChunk_nativeAllocate(
JNIEnv* env,
jclass clzz,
jint size) {
UNUSED(clzz);
void* pointer = malloc(size);
if (!pointer) {
(*env)->ThrowNew(env, jRuntimeException_class, "could not allocate memory");
return 0;
}
return PTR_TO_JLONG(pointer);
}
  • 通过malloc申请size大小的一块内存
  • 通过PTR_TO_JLONG这个宏,将指针的地址转为java中的long,返回给java。

因此,NativeMemoryChunk中的mNativePtr就对应着他在native中的内存区域的首地址的long类型

4.2 NativeMemoryChunk_nativeMemcpy

这个方法很简单。

1
memcpy(JLONG_TO_PTR(dst), JLONG_TO_PTR(src), count);
  • 这里的参数,分别对应java中的两个NativeMemoryChunk,和大小
  • 首先用JLONG_TO_PTR这个宏,将long专为指针
  • 用memcpy函数,进行复制操作,

4.3 NativeMemoryChunk_nativeFree

1
free(JLONG_TO_PTR(lpointer));

调用free函数将指针对应位置的内存释放掉。

其他的几个函数 这里就不说了。

需要注意的是,native内存管理实对应NativeMemoryChunkPool。

5 以native内存为例,了解fresco内存池

我们需要先来了解几个东西。

  • 池 负责存储某类型的数据
  • 桶 将池分为若干大小的块,每一个块就是一个桶
  • 每个同种都维护着一个队列,由LinkedList实现,实现先进先出的功能。

那么,NativeMemoryChunkPool这个池的桶是怎么划分的呢?默认的情况下,这个池是由DefaultNativeMemoryChunkPoolParams来配置的。有如下默认的一些桶。

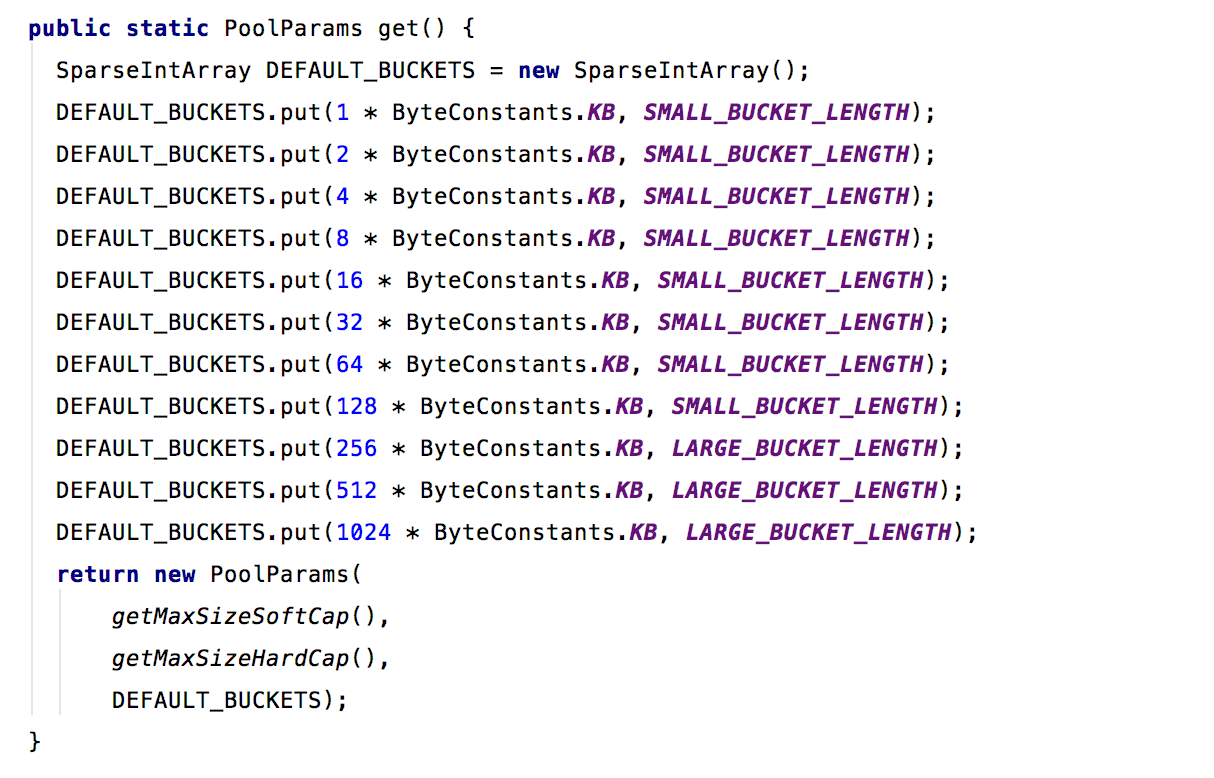
了解了这些,我们就从BasePool的get方法看起,看看他是如何实现的。

5.1 BasePool#get

这个方法比较长,分段来看。

1
2
3
4
5
6
7
8
9
10
11
12
13
14
15
16
17
18
19
20
21
22
23
24
25
26
27
28
29
30
31
32
33
34
35
36
37
38
39
40
41
42
43
44
45
46
47
int bucketedSize = getBucketedSize(size);
int sizeInBytes = -1;
synchronized (this) {
Bucket<V> bucket = getBucket(bucketedSize);
if (bucket != null) {
// find an existing value that we can reuse
V value = bucket.get();
if (value != null) {
Preconditions.checkState(mInUseValues.add(value));
// It is possible that we got a 'larger' value than we asked for.
// lets recompute size in bytes here
bucketedSize = getBucketedSizeForValue(value);
sizeInBytes = getSizeInBytes(bucketedSize);
mUsed.increment(sizeInBytes);
mFree.decrement(sizeInBytes);
mPoolStatsTracker.onValueReuse(sizeInBytes);
logStats();
if (FLog.isLoggable(FLog.VERBOSE)) {
FLog.v(
TAG,
"get (reuse) (object, size) = (%x, %s)",
System.identityHashCode(value),
bucketedSize);
}
return value;
}
// fall through
}
// check to see if we can allocate a value of the given size without exceeding the hard cap
sizeInBytes = getSizeInBytes(bucketedSize);
if (!canAllocate(sizeInBytes)) {
throw new PoolSizeViolationException(
mPoolParams.maxSizeHardCap,
mUsed.mNumBytes,
mFree.mNumBytes,
sizeInBytes);
}
// Optimistically assume that allocation succeeds - if it fails, we need to undo those changes
mUsed.increment(sizeInBytes);
if (bucket != null) {
bucket.incrementInUseCount();
}
}
  • 首先,通过getBucketedSize获取能容纳我们需要容量的桶,这个方法的实现在具体的池中,如NativeMemoryChunkPool,就是获取比容量大大师最近接容量的桶的大小
  • 通过getBucket方法获取对应桶容量的桶
    • 如果没有找到,就创建一个新的桶
  • 如果桶不为null
    • 通过Bucket的get方法获取一个对象,注意,这里用队列实现先进先出的功能
    • Counter 纪录使用容量和空闲容量
    • 状态追踪以及其他操作
    • 返回
1
2
3
4
5
6
7
8
9
10
11
12
13
14
15
16
17
18
19
20
21
22
23
24
25
26
27
28
29
30
31
32
33
34
V value = null;
try {
// allocate the value outside the synchronized block, because it can be pretty expensive
// we could have done the allocation inside the synchronized block,
// but that would have blocked out other operations on the pool
value = alloc(bucketedSize);
} catch (Throwable e) {
// Assumption we made previously is not valid - allocation failed. We need to fix internal
// counters.
synchronized (this) {
mUsed.decrement(sizeInBytes);
Bucket<V> bucket = getBucket(bucketedSize);
if (bucket != null) {
bucket.decrementInUseCount();
}
}
Throwables.propagateIfPossible(e);
}
synchronized(this) {
Preconditions.checkState(mInUseValues.add(value));
// If we're over the pool's max size, try to trim the pool appropriately
trimToSoftCap();
mPoolStatsTracker.onAlloc(sizeInBytes);
logStats();
if (FLog.isLoggable(FLog.VERBOSE)) {
FLog.v(
TAG,
"get (alloc) (object, size) = (%x, %s)",
System.identityHashCode(value),
bucketedSize);
}
}
return value;
  • 没有可以复用的话 就去native堆中申请内存,alloc 的具体步骤上面有
  • 如果超过了最大容量,就调整容量,这里的调整是指通过free释放一部分内存,上面也说道过。

5.2 BasePool#release

这个方法是我们主动释放一个对象所占用的内存。

实现比较简单,就是调用free释放内存,并且调整池的已用大小、空闲大小这些参数。


最近访客