_StriveG Blog

Service启动流程

1.前言

上一篇看了activity的启动流程,过程非常复杂,代码的细节都没多看,我们初学者,知道大体的流程就可以了。以后在慢慢看吗。今天来看下,service的流程,因为activiy涉及到activiy栈,所以比较难,但是我们的service不涉及,所以流程相对简单点。

我们启动service分为两种情况

  • startService
  • bindService

我们分开来看。我们知道Activity是Context,而Context的实现是ContextImpl,因此,我们从ContextImpl说起。

2.startService的方式

2.1 ContextImpl#startServiceCommon

在startService方法中,直接调用startServiceCommon,这个方法的核心代码如下:

1
2
3
ComponentName cn = ActivityManagerNative.getDefault().startService(
mMainThread.getApplicationThread(), service, service.resolveTypeIfNeeded(
getContentResolver()), getOpPackageName(), user.getIdentifier());

ActivityManagerNative.getDefault(),为binder客户端,上篇说到过。

在AMS中,客户端bp端为ActivityManagerNative的内部类,ActivityManagerProxy,服务端bn端对ActivityManagerService。

因此,我们略过bp端,无非就是向其中数据,然后transact。我们直接看bn端对应的方法。

2.2 ActivityManagerService#startService

在这个方法中,并没有过多的操作,而是将操作传递给ActivityService,

1
2
3
4
5
6
7
final int callingPid = Binder.getCallingPid();
final int callingUid = Binder.getCallingUid();
final long origId = Binder.clearCallingIdentity();
ComponentName res = mServices.startServiceLocked(caller, service,
resolvedType, callingPid, callingUid, callingPackage, userId);
Binder.restoreCallingIdentity(origId);
return res;

2.3 ActivityService#startServiceLocked

在这个方法中,经过进程检验、service注册检查、ServiceRecord属性设置等一系列操作之后,调用startServiceInnerLocked方法

2.4 ActivityService#startServiceInnerLocked

1
String error = bringUpServiceLocked(r, service.getFlags(), callerFg, false);

在这个方法中,后续操作交由bringUpServiceLocked处理。

2.5 ActivityService#bringUpServiceLocked

在这个方法中,有两种情况:

  • 需要的进程存在
  • 需要的进程不存在

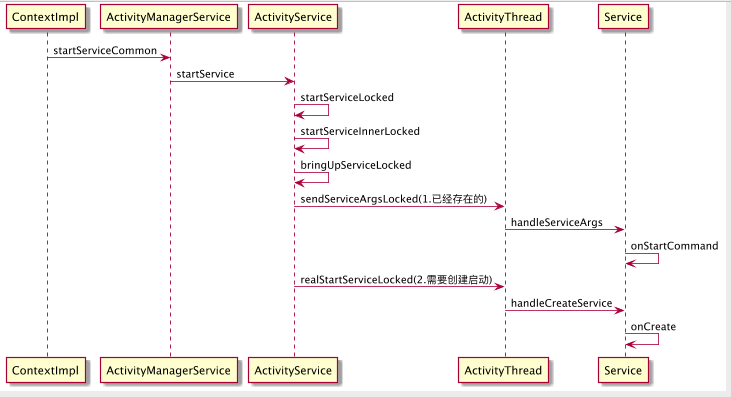
当service需要的进程存在的时候,如果,service已经存在了,那么通过sendServiceArgsLocked方法的后续操作调用onStartCommand,如果不存在,则调用realStartServiceLocked进程create操作。

如果需要的进程不存在,则需要fork进程,这个后面的文章在说。

解析来我们直接看realStartServiceLocked操作吧。

2.6 ActivityService#realStartServiceLocked

改方法核心代码;

1
2
3
app.thread.scheduleCreateService(r, r.serviceInfo,
mAm.compatibilityInfoForPackageLocked(r.serviceInfo.applicationInfo),
app.repProcState);

这样,通过调用ApplicationThread的对应方法,H类捕获CREATE_SERVICE消息,通过handleCreateService,来创建service。

2.7 ActivityThread#handleCreateService

1
2
3
4
5
6
7
8
9
10
11
12
13
14
15
16
17
18
19
20
21
22
23
24
25
26
27
28
29
30
31
32
33
34
35
36
37
38
39
40
41
42
43
44
private void handleCreateService(CreateServiceData data) {
// If we are getting ready to gc after going to the background, well
// we are back active so skip it.
unscheduleGcIdler();
LoadedApk packageInfo = getPackageInfoNoCheck(
data.info.applicationInfo, data.compatInfo);
Service service = null;
try {
java.lang.ClassLoader cl = packageInfo.getClassLoader();
service = (Service) cl.loadClass(data.info.name).newInstance();
} catch (Exception e) {
if (!mInstrumentation.onException(service, e)) {
throw new RuntimeException(
"Unable to instantiate service " + data.info.name
+ ": " + e.toString(), e);
}
}
try {
if (localLOGV) Slog.v(TAG, "Creating service " + data.info.name);
ContextImpl context = ContextImpl.createAppContext(this, packageInfo);
context.setOuterContext(service);
Application app = packageInfo.makeApplication(false, mInstrumentation);
service.attach(context, this, data.info.name, data.token, app,
ActivityManagerNative.getDefault());
service.onCreate();
mServices.put(data.token, service);
try {
ActivityManagerNative.getDefault().serviceDoneExecuting(
data.token, SERVICE_DONE_EXECUTING_ANON, 0, 0);
} catch (RemoteException e) {
// nothing to do.
}
} catch (Exception e) {
if (!mInstrumentation.onException(service, e)) {
throw new RuntimeException(
"Unable to create service " + data.info.name
+ ": " + e.toString(), e);
}
}
}
  • 构造service
  • 关联application
  • 调用onCreate 执行

就这样,一个全新的service就启动了。
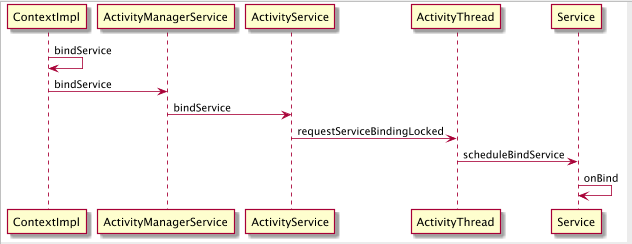
3.bindService的方式

这种方式会中甲调用直到ActivityService的bindServiceLocked方法,这个方法里首先会通过bringUpServiceLocked去船舰service,和我们上面一样,这个方法最后会调用requestServiceBindingLocked,requestServiceBindingLocked核心代码如下;

1
2
r.app.thread.scheduleBindService(r, i.intent.getIntent(), rebind,
r.app.repProcState);

随后会在activitythread中,调handleBindService方法,去执行service的onbind方法,具体的就不说了。

4.上图

这里只是简单的介绍了流程,很多细节的东西并没有看。


最近访客